3D ARTIST & MULTIMEDIA ENGINEER
LA MANIGUA
Responsible for all aspects.
The goal of the project was to explore a variety of animal skins put into a single creature. Therefore I came up with the concept of La Manigua, a hybrid creature that combines features of different animals found in the Amazon rainforest (Jaguars, Tapirs, Frogs, Hummingbirds, Guacamayas, Black Caimans and Armadillos).


Concept
Creating an original creature that could mix all these animals into one was a challenging task. La Manigua has the body, ears and spotted fur of a Jaguar; the head shape resembles a Tapir and the skin is like the one of an Armadillo; the chest is covered with small feathers like the ones Hummingbirds have on their heads and neck, the forelegs also have some feathers inspired on Guacamayas; the tail has the same shape as of Black Caimans' but with a Frog-like skin. Finally, to give it a more fantasy-like look, I added some hints of teal on the overall color, and I added horns to the design since it seemed like a fun challenge.
The name La Manigua comes from a term from indigenous communities in Colombia which means the whispering spell that pulls you back to the Colombian rainforest, it is the feeling of desire to be surrounded by the natural beauty of the jungle that always makes you want to come back.
I see La Manigua as a mythical creature that acts as a guardian of the rainforest.

Modeling
The modeling process was a combination of sculpting with ZBrush, doing the retopology with Maya and creating procedural geometry with Houdini.
The scales of the head were made procedurally following a Voronoi pattern, the scattering of the points was painted with weights so that there were bigger and smaller scales depending on the region of the head. When the scales were done, they were combined with the high-poly base mesh and later baked onto the low-poly model.

The feathers on the chest and belly resembled Hummingbird feathers. They were procedurally made by creating a single "feather strand" that would be later duplicated following a curve. The length of each copy could be changed by modifying the values on a ramp. Lastly, I generated a hair system to guide how the feathers would be placed along the mesh.

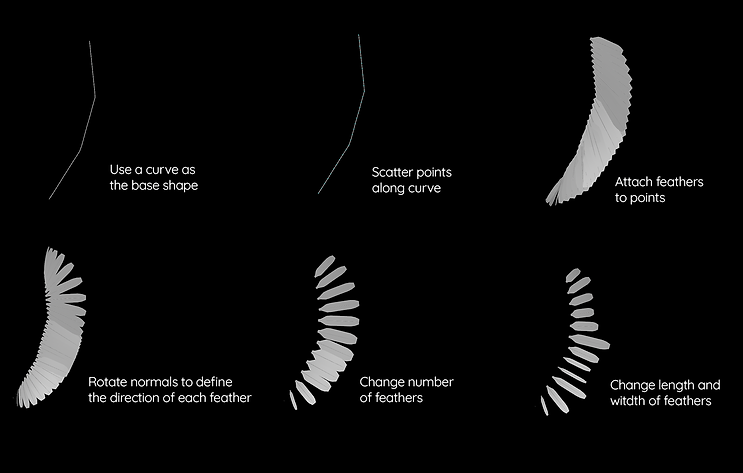
For the feathers on the forelegs, I used a system that takes a curve as the base and scatters points along it where the feathers will come out. The normals of the scattered points can be modified by changing the values on a ramp so that the direction of the feathers varies along the curve. The amount of copies of feathers can also be defined, as well as the length and width of each feather using a similar system like the orientation.
I created a few variations for the feathers that would be randomly placed on the feather system.

Texturing
The first step for texturing was to bake the high-res model onto the low-poly mesh using Substance Painter. Then, with the exported maps, I used them as a base to start texturing the majority of the creature with Mari. The longer feathers were also baked, but from the procedurally-generated geometry onto image maps using the Houdini Labs Maps Baker, and then the maps were used in Photoshop to create some iterations of color. The color of the feathers on the chest was randomly generated within some ranges of a color ramp for each feather using a Color Attribute, and then it was exported as data that could be read as the Base Color of the Arnold shader.


Look Development
I used Arnold in Houdini for shading and rendering the character. The challenging part was adjusting the shader attributes accordingly for each body part since there were different types of animal skins, this meant that attributes like the roughness, the subsurface scattering or the IOR needed to be adjusted with masks or maps to represent the big differences of each type of skin.
Lighting, Rendering and Compositing
To create the environment I used assets and textures from Quixel Megascans. The shot was lit with one key spot light using a gobo and an HDRI from PolyHaven. Lastly, I added an atmospheric fog to generate some God rays.
With the help of AOVs, I composited the final image so it would have a stronger outcome, adjusting the specular reflections, doing some color correction, adding some glow to the brightest spots, compositing the atmosphere on top, adding a depth of field, among other things, until I ended up with the final look.


